Send an email Action in Office365 Outlook Connector.(Power Automate Cloud flows)
This action is to send an email using Office365 Outlook.
Contents
How to use
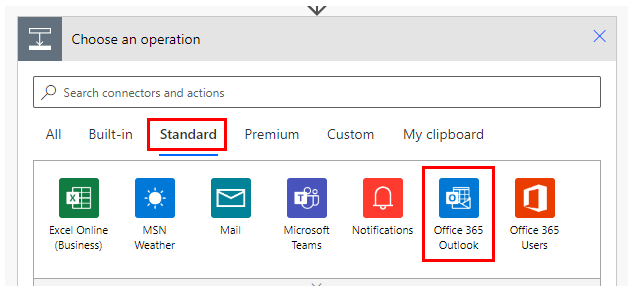
Select the "Office 365 Outlook" connector when adding steps to the flow.
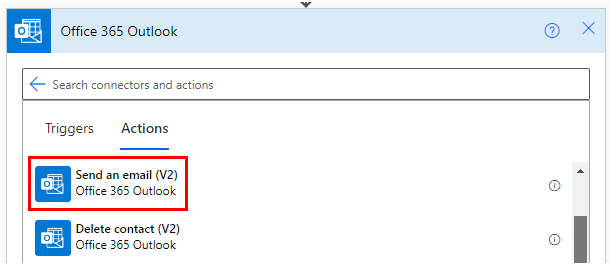
Select "Send an email" from the "Actions" menu.
Set parameters.
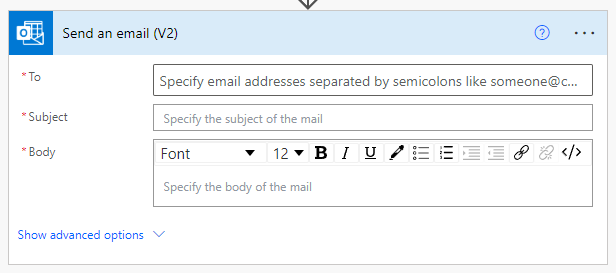
| Parameter | Default | Description |
|---|---|---|
| To | Required field | Specify the address (To) to which the mail is sent. |
| Subject | Required field | Specify the subject of the e-mail. |
| Body | Required field | Specify the body of the e-mail. If you want to insert line breaks in the variable, you need to specify tags. |
| From (Send as) | User set for the connector. | Specify the sender of the email (Office365 user). |
| CC | Empty | Specify the address (CC) to which the mail is sent. |
| BCC | Empty | Specify the address (BCC) to which the mail is sent. |
| Attachments Name | Required field when "Attachment Content" is set. | Specify the name of the attached file. Multiple file names can be specified. |
| Attachments Content | Empty | Specifies the content of the attached file. "File Content" for the dynamic content of file-related actions. Multiple file names can be specified. |
| Importance | Low | Specify the level of importance of the e-mail. Low Normal High |
At a minimum, the email is sent by specifying the recipient, body, and subject, and then launching the flow.
The email will remain in the sender's Outlook mailbox as a sent item.
For those who want to learn Power Automate Cloud flow effectively
The information on this site is now available in an easy-to-read e-book format.
Or Kindle Unlimited (unlimited reading).
You willl discover how to about basic operations.
By the end of this book, you will be equipped with the knowledge you need to use Power Automate Cloud flow to streamline your workflow.