Add a key column to a table in Excel Connector(Power Automate Cloud flows)
Add a single column item to the table.
How to use
The target Excel file must be stored in OneDrive or SharePoint.
The target cell range must be converted to a table.
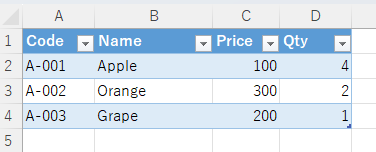
In this example, we will prepare a table with the items "Code", "Name", "Price", and "Qty".
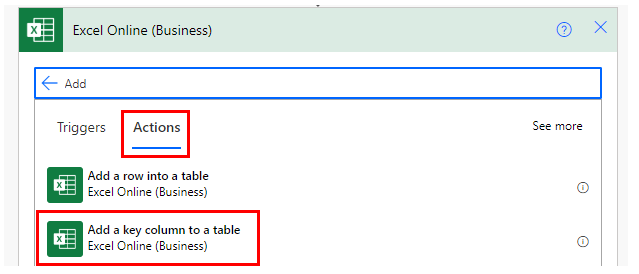
Select the "Excel Online (Business)" connector when adding steps to the flow.

Select the "Add a key column to a table" from the "Action" menu.
Set Parameters.
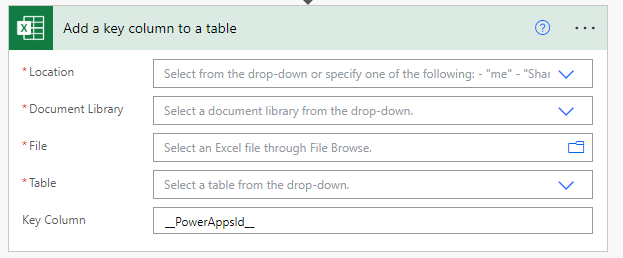
Parameters
Location
A list of OneDrive and SharePoints that can be connected will be displayed.
From among them, select the location where the target file is located.
Document Library
For OneDrive, select "OneDrive"; for SharePoint, select "Document".
File
Select a file.
It looks like a file path, but it is only a display and the content is an ID.
If you delete the specified file and then create a file with the same name,
it will be treated as a different file. (Reassignment is required.)
Table
A list of tables that exist in "File" will be displayed.
Select the table of interest from the list.
Key Column
Enter the name of the column to be added.
For those who want to learn Power Automate Cloud flow effectively
The information on this site is now available in an easy-to-read e-book format.
Or Kindle Unlimited (unlimited reading).

You willl discover how to about basic operations.
By the end of this book, you will be equipped with the knowledge you need to use Power Automate Cloud flow to streamline your workflow.