Move mouse to image Action(Power Automate Desktop)
The action is to find the specified image and move the mouse to that location.
Optionally, it can also be made to click.
This action is useful when the "Mouse move" action does not work well.
- 1. How to use
- 1.1. Parameter
- 1.1.1. Image to move to mouse to
- 1.1.2. Mouse Movement Style
- 1.1.3. Occurrences
- 1.1.4. Send a click after moving mouse
- 1.1.5. Wait for image to apper
- 1.1.6. Seconds before Click
- 1.1.7. Image matching algorithm
- 1.1.8. Mouse position relative to the image
- 1.1.9. Offset X, Y
- 1.1.10. Tolerance
- 1.1.11. Search for image on
- 1.1.12. Search mode
- 1.2. Variables produced
- 1.1. Parameter
- 2. For those who want to learn Power Automate Desktop effectively
- 3. Links
How to use
Drag "Move mouse to image" from "Mouse and Keyboard" under "Actions".

Set parameters.

Parameter
Image to move to mouse to
Captures the image to be used as the mouse move position.
The larger the image, the heavier the processing, so it is more efficient to limit the range as much as possible.
Also, since the image will be considered different if it is zoomed in or out, the magnification should be set to 100%. (Unless you use Power Automate Desktop to change the magnification.)

Mouse Movement Style
Select the speed of mouse movement.

Occurrences
Specifies the number of times the mouse moves.
Adjust this item if the target image occurs more than once.
If it is not found for that number of times, an error is generated.

Send a click after moving mouse
Change to ON if you want the click to occur.

If ON, specify an additional "Click Type".

In the "Advanced" section, "Seconds before Click" will also be added.
Wait for image to apper
Turn ON if there is a time delay between the execution of the action and the display of the specified image.

If ON, additionally set the upper limit of waiting time (failure timeout) in seconds.

Seconds before Click
When "Send a click after moving mouse" is ON, specify the time difference between move and click in seconds.

Image matching algorithm
If "Basic" does not work properly, test "Advanced".

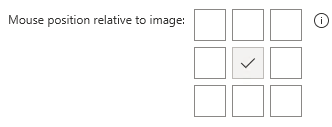
Mouse position relative to the image
Select the destination position from upper left corner, upper center, upper right corner, left center, center, right center, lower left corner, lower center, lower right corner.

Offset X, Y
Adjusts the destination in pixels.

Tolerance
The higher the value, the more ambiguous the image search will be (which makes the search process heavier and increases the likelihood of false positives).

Search for image on
Specify whether to search the entire image or only the active window.
The larger the search area, the higher the probability of a match, but the slower the process.
- Entire screen
- Foreground window only

Search mode
When a sub-area is specified, the position is also specified in X and Y coordinates.
- Search whole screen of foreground window
- Search on specified subregion of screen or foreground window

A narrower search is possible.

Variables produced
X・Y
The X and Y positions of the mouse destination are stored.

For those who want to learn Power Automate Desktop effectively
The information on this site is now available in an easy-to-read e-book format.
Or Kindle Unlimited (unlimited reading).

You willl discover how to about basic operations.
By the end of this book, you will be equipped with the knowledge you need to use Power Automate Desktop to streamline your workflow.
Discussion
New Comments
No comments yet. Be the first one!